Gears & Gadgets: Shift Cable Adjustments
Gears & Gadgets: February 2015
Shift Cable Adjustments
Gears & Gadgets is intended to provide IPMBA members with tips for properly maintaining their bikes and conducting emergency field repairs. I will also discuss current technological trends in mountain biking, and how they may be beneficial to Public Safety Cycling.
As I’ve previously mentioned, the drive train is certainly one of the most abused and finicky systems on the bike. One area of the drive train that often needs constant attention is the shift cables and housing.
Even well-maintained bikes will sometimes require adjustment on the fly. This installment of Gears & Gadgets will discuss shifting adjustments.
Barrel Adjustments
Let’s assume first that your cables and housing are in good shape and don’t need replacement. Let’s also assume that both derailleurs have properly adjusted limit screws, and the rear derailleur hanger is not bent. I will discuss proper adjustment of limit screws later in this article.
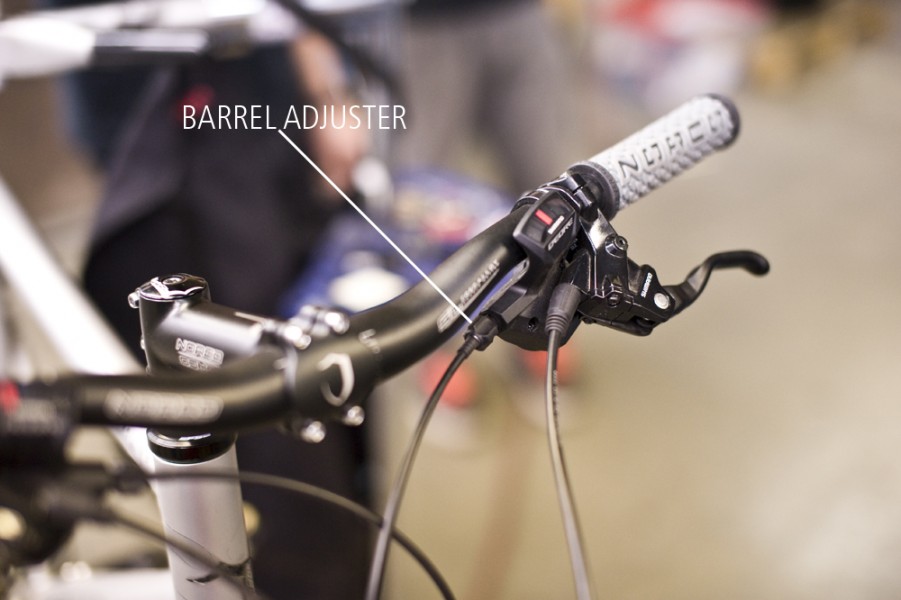
If you are riding along and your chain is jumping (usually in the rear), things aren’t quite shifting right, or you hear a “chattering” sound when you pedal, more than likely the rear derailleur needs some minor adjustments. This can be done while in motion using the barrel adjustors on your shifters. Knowing which way to turn the barrel adjuster is important. When a rear shift cable has too much tension, it will skip when shifting to bigger sized gears in the rear, or it won’t shift down to a smaller sized gear when you need it to. If a rear shift cable doesn’t have enough tension, it won’t shift properly to the easier gears, and it may skip when shifting to smaller sized gears.
Once you’ve diagnosed what the shifting problem is (too much tension, or not enough), you can make adjustments while you ride. To add tension to the cable, turn the barrel adjuster counter clockwise, which is unscrewing it. To release tension from the cable, turn the barrel adjuster clockwise, which is screwing it in. (Remember: lefty-loosey, righty-tighty). Hopefully your barrel adjusters have room to adjust a little bit each way.
Maintain a steady pedal cadence, and turn the barrel adjustor a quarter turn in the proper direction to correct the shifting problem. Continue in quarter-turn increments until the problem is resolved. If the chain is chattering, turning the barrel adjuster should cause the chattering to stop. If it is a shifting issue, such as jumping gears, you will have to shift around after turning the barrel adjustor to see if it resolved the issue.
The same concept can be applied to the front shifting. Most police bike drive trains have three gears in the front. Let’s say that when you shift into the big chain ring, the chain won’t go all the way up. Turn your barrel adjuster counter-clockwise to add tension to the cable. This will allow the derailleur to fully extend and shift into the large chain ring. Similarly, if you attempt to shift into the smallest chain ring and it won’t go down all the way, turn the barrel adjuster clockwise to release tension on the cable. This will allow the derailleur to drop fully to its limit. The only other issue with front shifting cable adjustment is chain rub. Keeping the principles of cross-chaining in mind, there should be minimal chain rub on the derailleur. If there is excessive chain rub, you should be able to remedy the situation with the barrel adjusters.
Limit Screws
Next, let’s talk about proper derailleur alignment and adjustment screws. Most bikes are equipped with a removable rear derailleur hanger. They hold up well to regular use, but after any crash they should be examined. If the derailleur hanger appears bent inward from the frame, gently pull on the derailleur body until it appears straight. Keep in mind that the best case scenario would be to replace the hanger, as they become weakened after being bent, but, a quick re-alignment in the field will keep you going.
So how do you know if your derailleur’s limit screws are not properly adjusted? A derailleur has two limit screws, a high and a low (usually marked H and L). There are two scenarios for both limit screws that would indicate they are not properly adjusted.
Let’s start with the front derailleur. Regarding the low limit screw, if the chain jumps off to the inside, then the screw needs to be turned in (clockwise). If the chain won’t shift down to the small ring and you’ve already released all tension from the cable, then the screw needs to be turned out (counter-clockwise). Regarding the high limit screw, if the chain jumps off to the outside, the screw needs to be turned out (counter clockwise). If the chain won’t shift up to the ring and you’ve added as much tension as you can, the screw needs to be turned in (clockwise). Most derailleur screws use a Phillips head, but some higher end versions use an Allen or Torx head. Again, making just quarter-turn adjustments, turn the limit screws in the direction you need them until the problem is solved. This is best done on a work stand but can be done in the field if necessary.
Now let’s discuss the rear derailleur limit screws. The high limit screw affects where the derailleur sits on the high (smallest) gears. Improper adjustment of the high limit screw will adversely affect all of the shifting. The low limit screw affects how far the derailleur extends in the low (biggest) gears. The high limit screw is easiest to adjust when on the stand, with the shift cable disconnected. Make sure your rear shifting is set to the smallest gear. Shift the front to the largest chain ring. Looking from behind the bike, straight at the rear derailleur, the derailleur pulleys should be just to the right of the smallest gear.
Turn the pedals and listen to the chain. If it chatters, make quarter-turn adjustments of the high limit screw until it’s perfectly quiet. I often find adjusting it back and forth until I find the sweet spot is the best way. Then, re-attach the cable, making sure to pull it so there is good tension and no slack in the cable. Begin pedaling the bike and start shifting through the rear gears one at a time. Shift up and down in the first few gears to make sure it is properly set. If there is chain chatter, or if it isn’t shifting up and down smoothly, make quarter-turn adjustments with the barrel adjuster for cable tension. Once you have the first few gears shifting properly, start shifting up into the bigger gears in the rear, again making minor adjustments as necessary as you move up. Don’t shift all the way into the largest gear yet.
Now shift the rear all the way back to the smallest gear. Also, set the front shifting to the middle chain ring. Stop the turning of the wheel if it is still in motion. Now, grab hold of the cable itself at some point along the frame (along the seat stay, down tube, top tube, wherever there is an exposed piece of cable).
Begin slowly turning the pedals and pull on the cable with your hand until the derailleur shifts all the way up to the small gear. Pedaling slowly here is important, because if you start turning the wheel too fast and the chain jumps to the spokes, you can cause damage. If the chain jumps over onto the spokes, the low limit screw needs to be turned in (clockwise), again a quarter turn at a time until it’s no longer jumping over. If the derailleur won’t shift all the way into the biggest gear when pulling on the cable in the same way, the low limit screw needs to be turned out (counter clockwise). Once the low limit screw is set using the cable-pull method, then you can use the shifter to go through all the gears and ensure everything is working properly.
Minor adjustments are the key to proper shifting adjustment, both with barrel adjusters and limit screws. Don’t start making full turns, instead keep doing quarter-turn increments until things are just right.
Next time we’ll talk about cable replacement.
The information described in this article is meant as a resource. Please know your own personal limitations when it comes to bicycle maintenance and do not attempt to repair anything you don’t understand or do not have the proper tools for.
If you have any questions, or suggestions for future topics, please feel free to email me at jared.williams@ci.tacoma.wa.us.
About the author: Jared is currently a Police Patrol Officer for the Tacoma Police Department. He loves to tinker, and can often be found obsessing of the mechanical state of his bicycles. Jared is the owner and operator of Piggies On Wheels, LLC, which exists for the purpose of public safety bicycle education. To learn more, go to https://www.facebook.com/PiggiesOnWheels.
Comments
Great tutorial! I think it wise to reemphasize that limit screw adjustments require a lot of practice. As for barrel adjusters, I found a great way to help people learn by categorizing or simply equating it to something else, “Turning the barrel adjuster clockwise will allow the rear derailleur to shift down - turning the barrel adjuster counter clockwise will allow it to shift up. It’s like the volume dial on your stereo.”
12:57pm, 03/07/2015