Gears & Gadgets: Replacement of Housing and Cables
Gears & Gadgets, March 2015:
Replacement of Housing and Cables
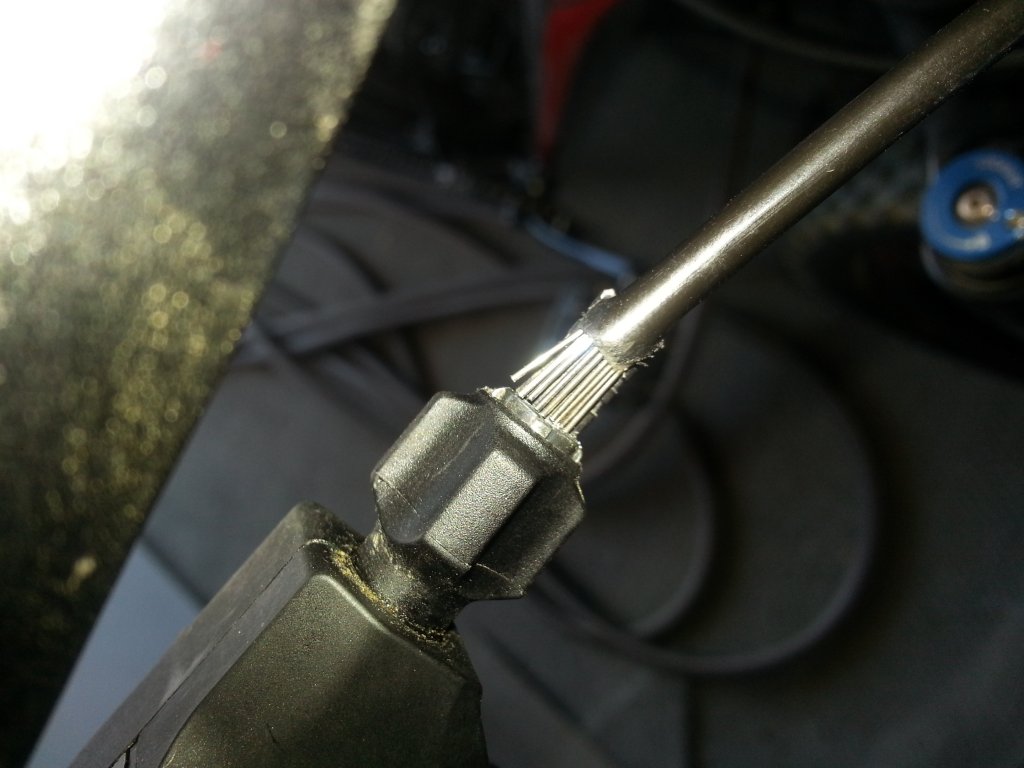
Photo: If your derailleur housing looks like this, it’s time to replace it.
Sometimes, things just wear out and need to be replaced. It is a good idea to replace cables when you see signs of fraying, rust, or other damage. A little lubrication can help shift performance with worn out cables, but it is only temporary. Any visible cracked or damaged housing is a good indicator it also needs to be replaced. Replacing these things is a fairly simple task and requires minimal tools. Make sure you have a quality pair of cable cutters, such as the Park CN-10, for this job. This work should be done on a bike stand. Emergency repairs in the field can also be done if you happen to have spare cables.
First, start by shifting both front and rear derailleurs to their smallest gears (yes, this is cross-chaining, but there will be minimum pedaling at this point). Release the cables from the derailleurs, most of which will use a 5mm allen wrench. Cut off the cable tip with a pair of cable cutters. I pull the cable through the housing, leaving the housing in the frame stops. How to remove the cable from the shifter varies by make and model. Most Shimano shifters use a plastic Phillips screw to cover the cable head. My current SRAM shifters use a rubber cover. Feed the cable all of the way out of the shifter. Now, remove the housing pieces one at a time. When you remove a piece of old housing, measure it out next to a piece of new housing and cut the new housing to the identical length. Again, use a quality cable cutter on the housing. If the housing wires are pinched closed, lightly squeeze them with the cutter until they open up. Put on fresh housing ferrules, and place the new housing back in the proper location. Do this with each piece of housing, one at a time, until they are all replaced. Then, feed a new cable through the shifter and housing pieces all the way back to the derailleur. Make sure all of the pieces of housing are properly set in the frame stops. This is the time to stage your barrel adjusters as well. You want your barrel adjusters almost all the way in. Leave them turned out about 1-2 full turns to give yourself a little bit of adjustment room.
Pull the cable taut and attach it to the derailleur. Don’t cut the excess cable off just yet. Grab an exposed piece of the cable between the derailleur and the shifter, just like I described for adjusting the low limit screw in the last edition of Gears and Gadgets. Start pedaling, and pull on that cable; repeat this step a couple of times. This will help the initial stretch of the cable. Then, check to see if the cable has lost tension. If so, release the cable from the derailleur, pull it taut, and reattach it. Now, using the shifter, shift through the gears one at a time, fine-tuning your adjustments as you go along. Once you know things are properly adjusted, trim the excess cable to no more than 2-3”, and crimp a cable cap on the end.
This same process can be repeated for the front derailleur.
Most of these same concepts can also be applied to brake cables and housing. If you run hydraulic brakes, you don’t have to worry about it. If you run cable-operated brakes, the concepts are the same. Make sure your brake pads are adjusted so they are not rubbing on the rim (with V-brakes or Cantilever brakes). I will discuss proper adjustment of brakes in full detail in the next installment of Gears & Gadgets.
The information described in this article is meant as a resource. Please know your own personal limitations when it comes to bicycle maintenance and do not attempt to repair anything you don’t understand or do not have the proper tools for.
If you have any questions, or suggestions for future topics, please feel free to email me at jared.williams@ci.tacoma.wa.us.
About the author: Jared is currently a Police Patrol Officer for the Tacoma Police Department. He loves to tinker, and can often be found obsessing of the mechanical state of his bicycles. Jared is the owner and operator of Piggies On Wheels, LLC, which exists for the purpose of public safety bicycle education. To learn more, go to https://www.facebook.com/PiggiesOnWheels.
Comments
Jared, as usual, an informative and well written article. A friendly point of contention however - you reference cable stretch and well, cables don’t actually stretch but their housings do become seated in the ferrules often producing cable slack. A lot of mechanics still espouse that misconception. Page 127 of the Complete Guide to Public Safety Cycling incorrectly states this. Thanks again for your posts and keep’em coming though!
01:29pm, 04/22/2015Mitch thanks for your comment. You are correct. I think the term “cable stretch” is usually a generic term that refers to the process you describe.
12:16am, 05/11/2015