Gears & Gadgets: Tubeless Tires
Gears & Gadgets: September 2014
Topic: Tubeless Tires
Gears & Gadgets is intended to provide IPMBA members with tips for properly maintaining their bikes and conducting emergency field repairs. I will also discuss current technological trends in mountain biking, and how they may be beneficial to Public Safety Cycling. Contributed by Jared Williams.
This month I will be combining the maintenance and technology aspects of this column. I will discuss the benefits of using tubeless tire technology, and go over how to properly set up and maintain them.
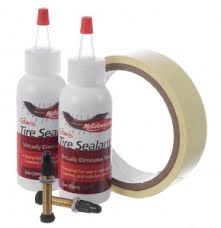
Tubeless tire technology has come a long way in recent years. Stan’s NoTubes, created by Stan Koziatek, was one of the pioneers of mountain bike tubeless technology. Multiple tire manufacturers also created Universal System Tubeless (UST), creating tires with thicker sidewalls, thus negating the need for an inner tube.
So what is tubeless technology and why is it beneficial to us? UST technology was developed in 1999, but has gained significant popularity in recent years. Many manufacturers have developed rims, tires, and sealants that create outstanding tubeless systems. The general technology includes rim tape that seals the rim/spoke holes, sealant, and a tubeless ready tire. That being said, I have successfully converted non-tubeless rims and tires to a tubeless system, though it requires a bit more patience. UST tires have thicker sidewalls than standard tires, allowing for the weight and stress to be placed on the tire and not the tube. The sealant is put in to seal the natural pores in the rubber, and seal any future punctures that occur.
There are huge benefits to running tubeless tires, the most obvious being a reduction of flat tires. Puncture flats are generally quickly sealed by the sealant in the tire. Pinch flats are non-existent since there is no tube to pinch. However, with no tube, if you hit a square edged obstacle hard enough (such as stairs or a large rock), you can “burp” the tire. Burping results in loss of air pressure, as the bead of the tire temporarily comes off of the rim. A severe burp can result in the bead staying off the rim, resulting in a flat tire. However, in my experience I have never personally burped a tire off the rim or lost any significant air pressure.
One of the other benefits of tubeless technology is the ability to run lower air pressure without fear of a pinch flat. This is generally more beneficial in mountain biking/trail riding, where pressures in the 25-30psi range are not uncommon. We generally won’t run that low of a pressure on patrol, because higher pressures provide less rolling resistance in an urban environment.
I currently have my patrol bike setup with tubeless tires. I ride a 2014 Trek Stache 7 outfitted with Maxxis Hookworm 29X2.5” tires. I converted the wheels using Gorilla Tape and Stan’s sealant. The tires are not UST, though as I said previously, virtually any tire can be converted to tubeless. I typically run air pressure around 40psi, though I have been experimenting with varying air pressures while conducting stair ascents and other tactics.
From my own personal observations, I have found running tubeless tires on my patrol bike to be a huge benefit. I have found that with the ability to run lower pressure (around 40psi), the ride is less harsh and the tires almost tend to mimic short-travel rear suspension. Think of it as a bit of a cushion.
Naturally, I haven’t had any issues with flat tires, which is a benefit with all the broken glass and other hazards around town. There is a reduction in weight of the wheels with the absence of a tube, allowing for slightly snappier acceleration. Reducing revolving weight is the most efficient way to quicken up the way a bicycle responds to rider input.
There are drawbacks to a tubeless setup. I did mention “burping,” though it is not common. The biggest drawback is setup, especially for first-timers. It can be daunting and a bit messy. This is even more so if you are using a non-UST tire or rim. However, once you’ve done it a few times, just like anything, it becomes easier.
If you have the ability to purchase (or have spec’d on your bikes), I recommend a UST or “tubeless ready” rim. This will make the whole setup much easier. A tubeless ready tire is also nice, but I’ve found they are not always necessary, depending on sidewall width.
There are multiple ways to seal up a rim. Some UST or tubeless ready rims may already come sealed. Many manufacturers, including Bontrager, offer a tubeless rim-strip in varying wheel sizes. There is also Stan’s NoTubes rim tape, which seals the rim very well. However, Stan’s rim tape can be a bit expensive.
My recommendation is to use 1” Gorilla Tape. You can buy a roll of this stuff at virtually any hardware store for less than $10. Using your rim-tape of choice, start the tape next to the stem-hole in the rim. Wrap the tape over the stem-hole on the first go around. Go around the rim a total of two times, passing over the stem-hole a third time. As you are taping, make sure to go slow (put the wheel in a truing stand if you have one), pushing the tape down and getting out the air bubbles. This will ensure the rim is significantly sealed. Then, push the tubeless stem through the tape and stem-hole. Do not pre-puncture the tape over the stem-hole if you can avoid it, as it will allow for a better seal if you use the stem to push through the tape. Snug the stem down hand-tight, then use a pair of pliers to get another turn on the stem nut, ensuring a tight seal.
Now that the rim is ready, it’s time to put the tire on. Seat the tire on the rim fully on one side. Then seat the other side of the tire about 3/4 of the way, leaving a portion unseated so you can add sealant. Read the bottle of sealant to determine how much to put in. I’ve only used Stan’s sealant, and for a new tire (especially non-UST), I generally add two measuring cups worth (the kit should come with a measuring cup). Then, finish seating the tire onto the rim (turn the unseated portion up so the sealant drops down to the seated portion, preventing messes and spills).
Once the tire is fully seated, it’s time to inflate. I prefer to use an air compressor, though it is possible to use a hand pump. Be careful using an air compressor so that you don’t blow it out, causing a huge mess and potential injury. The tire bead will pop as it is seating. I will generally inflate to 50-60psi to allow the pressure to push the sealant into the tire pores and other areas that may need sealing. Turn the wheel, shake it, and just move it around. You may hear air escaping – if you do, focus on shaking the sealant to that area and it should stop. You may have to add air several times and repeat the shaking process, especially on non-UST tires. On the Hookworms I have, I had to repeat this process several times over a few days until everything was finally sealed up. Since then, I haven’t had any leaks other than standard air pressure loss (which occurs with tubes as well).
Make sure you change out the sealant according to manufacturer specifications, but in general it’s a good idea to do it at least twice a year.
Once you have successfully set up your system, experiment with tire pressures! You’ll be amazed what a few PSI difference will make.
Comments
Outstanding article! I couldn’t agree more. A 29er with a tubeless setup is a drastically more versatile machine. It is amazing what is available to us as police cyclists today; I am grateful to be a part of it.
04:34pm, 09/03/2014Gears & Gadgets! Well it’s about time:)
I would just like to say, ‘less gears, less fears’.
07:29pm, 09/03/2014...More know-how:
Dip the rubber end of the valve stem in sealant before you insert it into the rim hole to prevent leaks there, and tighten the valve nut with your fingers (not pliers, which will make a roadside repair more difficult).
04:04pm, 09/06/2014Still more know-how:
Lubricate the tire beads with soapy water to help glide the beads over the rim, and to assist in seating the tire on the bead during inflation (this will be of great importance if you don’t have a compressor/compressed air to blast the bead into place). Use only your hands or thin plastic levers to install a tire bead over the rim, taking care not to deform the bead’s sealing surface (tubeless tire beads are more reliable than regular tires in this respect).
04:05pm, 09/06/2014Invest in the NoTubes Core Remover tool and Tire Sealant Injector. This combination allows you to add sealant through the valve stem and makes for a very clean installation (no spills on the floor!). After the tire bead is properly seated, deflate the tire, then use the Core Remover to remove the valve’s core, and inject the sealant (measurable with the Injector’s side markings) using the Injector. No muss, no fuss…
04:08pm, 09/06/2014....Not to mention, it’s far easier to inject new sealant every couple of months. Thread the valve core back in and inflate. Each is priced around $10 (Amazon) and both are very portable for travel. Cantitoe Road (IPMBA PPP) has the CaffeLatex, tubeless rim strip/valves, injector, tool, as well. Never used them, but I’ve heard they’re quite good.
04:09pm, 09/06/2014Since going tubeless over a year ago, I have yet to experience a flat tire. I’ve been ‘showered’ with sealant when the tire has punctured, which is quite startling when you’re riding, but not real invigorating (a mouth full of sealant doesn’t taste too bad). The hole coagulates quickly without having to stop though….
04:13pm, 09/06/2014....I haven’t had to break out a tubeless-specific patch, boot+super glue, plugs, or the Genuine Innovations Tubeless Repair Kit. There are urban legends on tire repair methods involving dental floss and skin grafts…
~Mitch
04:14pm, 09/06/2014I have run tubeless tires on my personal mountain bike for several years and cannot say that I am a big fan, primarily from a maintenance perspective. I spent far more time on maintenance, as mentioned above, at least twice annually, renewing the tubeless material. If you keep up with it, it is manageable but still a fair bit of work. I went to the effort of completely removing the tire each time and removing all of the old tubeless sealant, before I added new sealant.
10:17am, 09/08/2014Continued . . . Note: if you go too long without doing this, it will be a VERY long process to remove the old sealant. I find myself spending far less time replacing flat tires on my personal bike as well as my patrol bike than I did maintaining my tubeless system. So, unless pinch flats and running low PSI are frequent issues, I would not recommend converting to tubeless.
10:18am, 09/08/2014Hey Brad, how much sealant did you put in? I’ve never had to replace old sealant. I’ve had good luck putting in just two scoops with 27.5x2.35 tires, then adding a scoop periodically. It stays in a liquid form up to seven months, then it might turn into a ‘Stanimal’, a term the bikers use for the strange rubber shapes that form when the liquid solidifies. Even then, you can’t really feel it, and I’ve only had one in the last couple of years…
12:29pm, 09/08/2014...I guess I’ve spent an total average of three hours a year on my tubeless setup (using the prescribed methods, including repairs, which were none), and countless hours annually setting up and maintaining the tubed tire before going tubeless. I would guess the only reason not to go tubeless is if you don’t get any flat tires, which isn’t very realistic here, but even then the less weight/performance gain with tubeless would outweigh. Not sure why you’re removing old sealant if it isn’t solid.
12:48pm, 09/08/2014Great comments guys, thanks Mitch for the added tips. All things I know and have used, just forgot to mention. Plus Maureen gives me a word limit
07:49pm, 01/20/2015