Maximum Braking: Move Back and Stay Back
by Kirby Beck PCI #002T/EMSCI #017
Coon Rapids Police Department (MN)
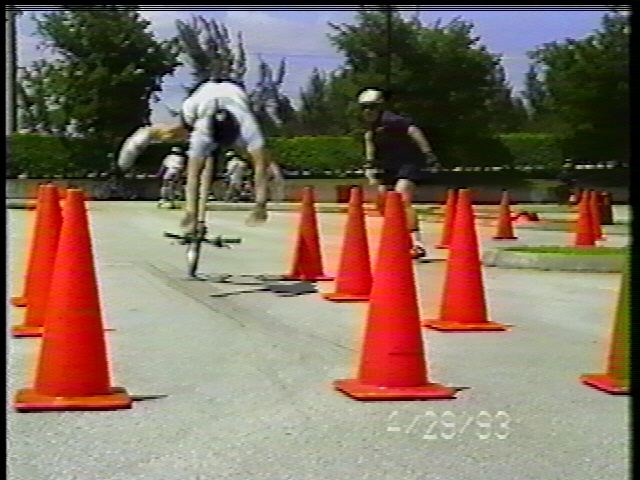
Many of you may have seen the infamous crash video that was shot at the 1993 conference by a member of Denton, Tx., PD. The conference was in Fort Lauderdale, and I was teaching a workshop on basic skills. The class included maximum (emergency) braking. As the video shows, a rider from Daytona Beach PD approaches the “braking box” and applies both the front and rear brakes. His back wheel lifts off the ground. He is vaulted over the handlebars and hurtles toward the ground. He crashes to the pavement in the blink of an eye. As a result, he fractures his left wrist, smashes the top of his helmet on the asphalt and breaks his Raleigh Police Special Technium bike frame.
Having a student sustain an injury in a training session is nearly as traumatic for the instructor as it is for the student. As a result of that event, I have been developing a better and safer way to teach emergency braking to basic course students. Although much of it is reflected in the Instructor Manual’s Basic Skills Drills section, the information in this article is not. This method has evolved from watching students try to learn this skill. Having taught literally hundreds of basic students, and nearly as many instructor candidates, I can confidently say that this variation of the technique seems to make this critical skill safer to teach and perform. I have been teaching this way for about three years, and to date I have not had a single student crash while using it as instructed.
In order to stop quickly, a cyclist must use the front brake. As Allan Howard (PCI #001T) once told me, the front brake handle can work “kinda like an ‘eject’ button.” Many students know that, and as result are quite apprehensive about using it at all. The skill is best taught – and learned – in small steps, an approach which helps build confidence. This approach also enhances safety because the maximum braking drill cannot be effectively spotted. Things happen much too quickly for spotters to react.
There are several common mistakes associated with performing or teaching the maximum braking exercise, or emergency stop:
- Failure to move the weight (center of balance) back far enough;
- Failure to come to a complete stop at the conclusion of the drill;
- Failure to use toe clips, or using toe clips that are cinched too tightly;
- Releasing or increasing the brake while moving forward over the saddle;
- Failing to train students to establish a stable base by putting a foot down at the conclusion of the drill;
- Using a saddle that is too wide, or a bike frame that is too large, to allow the rider to get far enough back on the bike
- Failing to recognize rear wheel skid or load lightening, and adjusting front brake pressure accordingly.
This skill is part of the training because it enables a cyclist to stop quickly and avoid striking vehicles, pedestrians, or any other object that suddenly blocks the path. Allowing students to ride off after doing a brief track stand is not sufficient, and does not teach the whole drill. There will be times when they will have to stop and stay stopped. That means putting at least one foot on the ground, and instructors must require their students do it!
The dynamics of braking a vehicle, using its front brake, is such that the weight shifts toward the front. On a light vehicle like a bike, this may actually cause the rear wheel to lift completely off of the ground. Cyclists counter this action by moving their weight back over the rear wheel and then controlling the amount of front brake pressure used if the rear wheel starts to skid. Skidding is an indication that the weight on the rear wheel is reduced, or beginning to lift. If the rear wheel skids, it is necessary to reduce pressure on the front brake lever.
For several years, I have been using the mnemonic “PEDALS, BUTT, BRAKES” to help students remember critical skills. Since physics won’t allow them to succeed in any other order, this phrase is worth remembering.
“PEDALS” means the pedals are placed in a horizontal, or 3:00 and 9:00, position. Besides providing a balanced and squared base, this allows for maximum leg extension to move the weight back on the bike. This is more important than it seems. If you fail to achieve this pedal position before moving your weight back, it probably won’t happen.
“BUTT” reminds you to move your buttocks completely off and behind your saddle, and over the rear hub. Public safety cyclists usually have some sort of rear rack pack behind their saddle. That means your weight will be positioned over the rack pack. If your butt isn’t back there when the brakes are applied, it won’t be moving there any time soon! Once you apply the brakes it will take nearly double the rearward movement to overcome the inertia on the lightened back end. Just ask the rider in the previously described video (and pictured above).
Sometimes that is easier said than done. Baggy shorts can catch on the saddle, preventing the rider from moving back and forth as necessary. Sometimes the saddle is too wide; for this reason, students should use mountain bike saddles, which are narrow enough to allow for this back-and-forth movement. Students don’t need extra wide, “tractor seats,” or add-on gel cushions that tie over the saddle. One brand of add-on I particularly remember was called “Comfy Buns.” It was comfy all right, until the rider crashed because of it. Even some of the noseless saddles promoted at our conferences can make moving back and forth over the saddle more difficult. Whether they work to prevent impotence or not is up to the researchers at NIOSH to determine. I only know that their extra width may cause handling and control problems. A frame that is too big for the rider can also make it difficult to move far enough back to get over the rear hub. This is a safety issue; cyclists really should be using properly fitted bikes.
“BRAKES” means that your pedals and butt are in the proper position and it is therefore safe to apply both brakes. The Effective Cycling video and text tell us the front brake should be applied 2-3 times harder than the rear one. It is essential, however, to be prepared to release some pressure to reduce rear tire skid, if necessary.
Now comes the part for inspired the title of this article: once you move back, stay back. I’ve seen many things happen when people are learning this skill.
After mastering PEDALS, BUTT, BRAKES, problems arise primarily in two areas: pedal retention and inertia. Staying back behind the saddle reduces or eliminates both problems. Though the cyclist should move their butt off and behind the saddle, it is only when they put their foot down and stop that they may end up somewhat sitting on the rack bag. I’m not trying to give the impression that the rider should actually sit on the rack or bag, especially when the bike is still moving. Racks are not designed to handle the full weight of the rider.
IPMBA teaches two types braking techniques: planned and maximum (emergency). In an emergency, the rider needs to come to complete and controlled stop as quickly as possible. That is made easier by establishing what I’ll call a three-point stance. That preferably means two tires and one foot touch the ground. I have seen it done with two feet and one front tire, but that was ugly, as well as painful!
In the Effective Cycling video, a female cyclist demonstrates the maximum braking technique. It properly shows the elements of PEDALS, BUTT, BRAKES. She demonstrates the braking technique but is placed in freeze frame, and the technique is not shown to completion. We don’t see her deal with her toe clips or the effects of inertia. If students aren’t required to come to a complete, foot down stop, they won’t learn to deal with it either!
The natural tendency of most cyclists is to move their weight to the front of their saddle again before coming to a complete stop. That’s what we do when we make routine, planned stops. If their body is moving forward at a rate slightly different than the rate at which the bike is slowing, inertia will catch up to them. They are still at risk of doing a dreaded “endo” or smashing their crotch into the stem. In order to put a foot down, they have to release their pedal retention.
That means that while they are moving their body forward, they have to move their foot backwards, to get it out of the toe clip. These counter-directional movements tend to exaggerate the problems with inertia, especially for beginners.
When the rider stays behind the saddle, both problems are reduced. They aren’t tempting inertia and associated problems. They pull their foot out of the toe clip in the same direction as their body. They can quickly pull their foot out of their retention device and put it on the ground, thus establishing a stable three-point position. Staying back isn’t used every time you stop; it is saved only for those rare emergencies. It may not be pretty, but it works. Most importantly, it seems to be safe.
Once a person has improved their skills and gained confidence with toe clips, moving to the front of the saddle may become something they do naturally. But they really don’t have to. In an emergency stop, once they move back, they can stay back. It works just fine.
(c) 2004 IPMBA. This article appeared in the Summer 2004 issue of IPMBA News.